I have been busy preparing my entries to apply for the Kaisercraft designer team. What with Easter and the boys being on school holidays, it has been a while since my last post. Not that I havn't been crafting however, as you will see...
100% Pure layoutKaisercraft Birdsong collection - morning flight
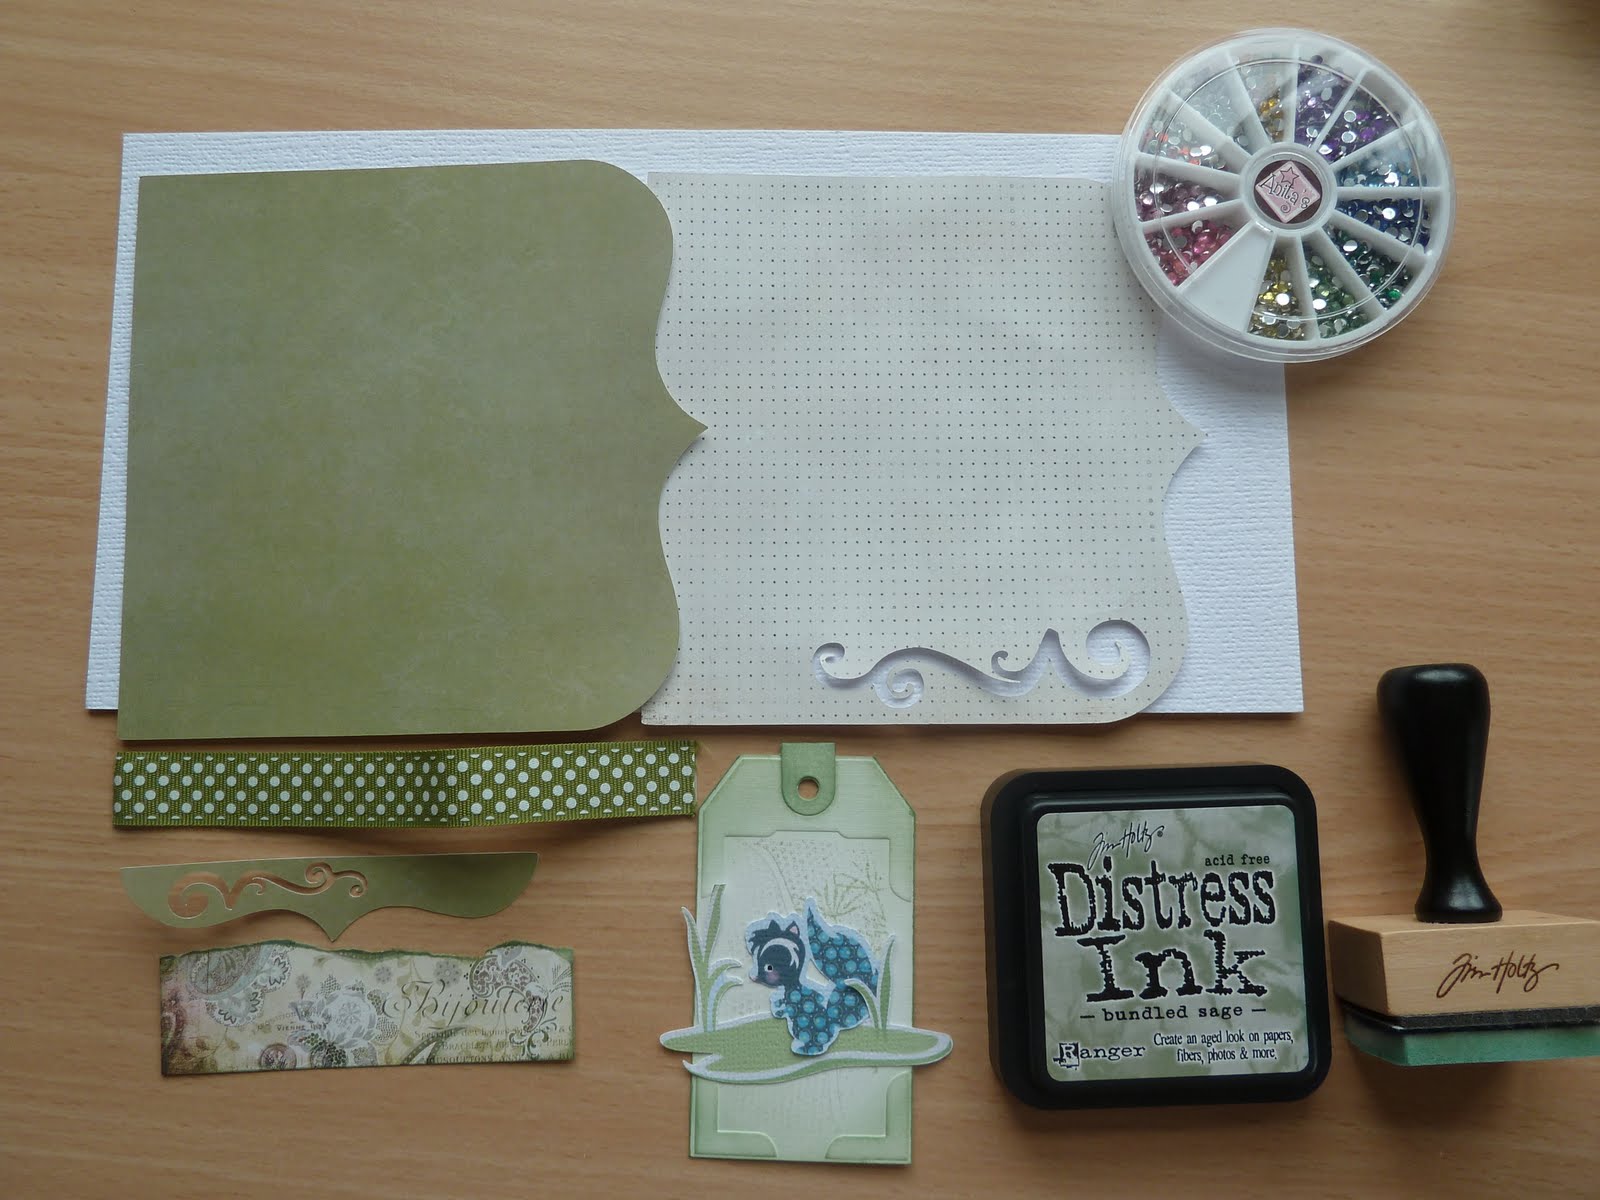
Green Bazzill card stock (sorry no name)
Kaisercraft Secret Bird Society collection - undercover
Kaisercraft hideaway collection - refuge (borders)
Karen Fosters scrappers floss, tawny
Kaisercraft Lace pack, natural
Epoxy buttons
Distress Ink, brushed corduroy
ATG gun adhesive
Cricut Elegant Edges Cartridge
Epiphany craft punch and epoxy buttons
Using an electric die cutting machine (Cricut) and the Elegant Edges cartridge, select the book feature and make a cut with the Secret Bird Society, undercover paper, at 9.8". Make a second cut with Bazzill bard stock in green, using the blackout book feature at 10.1". Glue together with their edges flush to the left, and use a whole punch device to create the look of a spiral note book.
Use scrappers floss to inter-twine through the punched holes the place onto the 12x12 Kaisercraft Birdsong collection, morning flight backing sheet. Again ensure the straight edges are flush together on left hand side. Ink all edges with brushed corduroy ink.
From the hideaway collection, choose the refuge borders and cut a section of three borders deep and 5.25" long. Cut along the printed scallop of this section to create 2 pieces. Glue the larger piece, scallops pointing down, 2.5" up and 1" from the left on the script paper. The 2nd scalloped border place at right angles to the left, running up alongside the double border.
Using an electronic die cutter, cut the title tag at 1.5" and attach as a ribbon slider, using a length of kaisercraft lace, just above the scalloped border and attach to the reverse of the page.
Place the photo so that it is bordered by the already positioned layers and from the remaining borders of the hideaway collection, carefully cut out a flourish and position to the right of the photo, slightly overlapping it.
Take 3 epoxy buttons and the Epiphany crafts punch select paper to reflect the photo (in this case the dandelions) and adhere the discs of paper to the buttons. Place on the layout in a line to the right of the photos.
Together Layout
Kaisercraft Up, Up and Away collection - moon ride, bumpercar & ferris wheel
Kaisercraft natural lace pack
Adhesive gems
Promarker - ice grey
ATG gun adhesive
Cricut Graphically Speaking cartridge
Cut a 4" strip from the moonride paper (balloons), and two 0.5" strips from the stripe side. Adhere each 0.5" strip to the 4" balloon paper to create a border.
Create a second layered border with two 0.5" strips of the brown ferris wheel paper.
Adhere centrally (running east to west) to the green side of the bumpercar paper.
Cut a length of the wider Kaisercraft natural lace and position below the layers already in place, and secure at the reverse of the layout.
Mat and layer a photograph (landscape orientation) onto the brown side of the ferris wheel paper. Adhere to the layout centrally, on the right hand side.
Use the electronic die cutting machine cut a title from the ferris wheel paper, at 1" high, adhere to the lower half of the balloon layer on the layout, justified to the left. Using a promarker pen in a grey, highlight the lettering to create shading.
using a mixture of pale green and yellow gems, adorn one of the balloons.
Beach Cricket Layout
Kaisercraft Seaside Collection - coastline, umbrella & rock pools
Bazzill cardstoack dark blue (sorry no name)
Co-ordinating twill ribbon & brad (from stash)
Swiss dots embossing folder
Graphically Speaking Cartridge (electronic die cutting machine)
ATG Gun adhesive
Ranger Glossy accents
Distress Ink - brushed corduroy
Cut the umbrella paper to a size of 7x12", tear along the top 12" edge and ink with brushed corduroy ink. Along the lower 12" edge manipulate the paper in a rolling motion to eventually end up with a rolled up edge revealing the red reverse to the paper. Secure the rolled edge with adhesive so that the complete layer is roughly 6.5" wide.
From the coastline borders paper, select the blue flowery border, cut from the page, and stick to the layout background (blue bazzill cardstock) 3.5" from the top.
Layer the torn edge of the umbrella paper from step 1, onto the blue border. Cut the red text border from the coastline paper and position below the red rolled section of the umbrellas paper.
From the coastline borders again, cut a section from the yellow and white flowery border to a size 1.25"x7", and emboss with the swiss dots embossing folder. Adhere to the umbrellas paper (justified right) about 0.5" up from the red roll.
Mat and layer 6x4" and a 2x3.5" photos onto dark blue bazzill cardstock. Position into place the larger photo above the yellow flowered strip and the smaller photo appropriately above.
Tie a knot onto one end of a 8.5" length of twill ribbon, and with the know to the left, position along the bottom of the larger photo.
Select 3 surf boards from the coastline borders paper, and cover completely with glossy accents. When dried completely cut out and position on the lower left hand side of the large photo, and secure in place with 3D foam pads.
Using the electronic die cutter cut a wave motive (from dark blue bazzill card), a tag and a journalling card (from the rockpools paper), and position in place.
Crafter at Work Door Hanger Kaisercraft Secret Bird Society Collection - mystery & shh
Kaisercraft Lace Pack - natural
Kaisercraft Beyond the Page door hanger
Karen Foster scrappers floss - tawny
Flowers & Button from stash
Brown acrylic paint
Martha Stewart Scalloped punch
Cover the kaisercraft door hanger with paper from the Secret Bird Society collection, mystery paper. Ensure to position so the pattern suits the shape, and adhere using glue of choice.
Cut a section from the shh paper 3.5x2.5" and mat onto a piece of mystery paper (dark side) cut to 3.5 x 4". use the Martha Stewart border punch top and bottom to create the scalloped border.
Using a die cutting machine (and software to customise the wording) cut the lettering to fit the shh layer. Cut the lettering from the dark side of the mystery paper. Position on the layer and stick. use a gem to highlight the larger letter 'C'.
Position the whole layered title into a place that suits the pattern of the paper you have covered the door hanger with. Hand tie a bow with the kaisercraft lace and position on the lower left corner of the title layer.
Wind scrappers floss around the top half of the hanging section, when you get to the end use the loose ends to secure in place the flowers and button.
Finish off my painting the raw edges of the hanger with brown acrylic paint.
Craft Room Door Plaque
Kaisercraft Beyond the Page Panorarma frame
Kaisercraft Secret Bird Society Collection - Disguise, shh,
Kaisercraft Lace Pack - natural
Kaisercraft clear stamps - bubblewrap, grid, Le Chateau (bird cage)
Kaisercraft acrylic paint - eggshell
Bazzill basic cardstock - cantaloupe
Distress Ink - walnut stain & bundled sage
Heritage, Cindy Loo & Opposites Attract Cartridges (cricut)
Gems & brad from stash
Promarker - dusky pink
Cover the outside of the frame with shh paper (feathered pattern) and the inside aperture with the reverse. before sticking ink the edges with walnut stain ink.
Randomly stamp the inside aperture with the grid and bubble wrap clear stamps using bundled sage ink. Stamp the bird cage from the Le Chateau stamp collection using blotted walnut stain ink, on the right hand side of the aperture panel.
Using software from the electronic die cutter, manipulate the lettering to fit the required size and cut using the green disguise paper. Stick flat to the aperture and highlight certain letters with small pale green gems.
Using the heritage cartridge cut three trees and there shadows mounts. Cut one tree at 3" using shh green and disguise green (layer & shadow respectively). Then two more trees at 2" using shh patterned paper and disguise green (layer and shadow respectively). Assemble all trees and ink lightly with walnut stain.
Again using heritage cartridge cut a swallow at 2" from bazzill cantaloupe, and its shadow from disguise green. Run through an embossing machine and ink edges lightly after assembly. Cut 5 further swallows ranging in size from 0.6 - 1", colour using promarker dusky pink, to match the rest of the palette.
Take a 11" length of kaisercraft lace and position along the bottom length of the frame, tying a know onto the left end, and securing a loop on the right end with a brad. Secure the lace onto frame with double sided tape.
Position the the birds and trees on to the top of the frame.
Adhere the two parts of the frame together using a strong superglue, and to finish, paint all raw edges with kaisercraft acrylic paint in eggshell.
Happy Birthday Card
Kaisercraft Secret Bird Society Collection - shh, mystery & conceal
Kaisercraft Le Chateau - birdcage & mini birthday greetings
Kaisercraft Lace Pack - natural
Distress Ink - walnut stain & bundled sage
Ranger glossy accents
Ranger distress stickles - old paper & peeled paint
Karen Foster Scrappers floss - tawny
Flowers & button from Stash
Flourish embossing folder (cuttlebug)
Cut a 5.5" square from the feathered shh paper, and emboss with the flourish embossing folder. Lightly ink the edges, and highlighting some of the embossing with the walnut stain ink.
Cut a plain blue strip and also the blue spot border, both at 1x5.5"from the conceal elements page. Position and stick together about 0.25" from the bottom of the embossed paper from step 1.
Take a 6.5" length of wide lace and layer on top of the borders, allowing about 0.5" of the blue spot paper to show below it. Secure in place on the reverse of the embossed shh paper. This whole section can now be stuck to the front of a white 5.75" square card.
Cut a 2.25 x 5" rectangle from the plain conceal paper, shape one of the short sides with a martha stewart punch (this will be the bottom of the panel). Round the 2 top corners with a paper rounder punch. Mat this panel on to a piece of the dark mystery paper, again round the top corners to match. Cut a strip 0.5 x 2.5" again from dark mystery paper, and layer at the bottom of the panel just above the punched border.
Lightly stamp with the bubblewrap and bundled sage the background of this panel, and then overstamp the birdcage using walnut stain distress ink. When the ink is dry over the whole birdcage with glossy accents and leave to dry well (preferably overnight).
When the birdcage is dry position and stick the panel to the right hand side of the card, centrally.
From the conceal paper, cut out one of the butterfly elements, one bird, and two of the leaf sprigs, and highlight with distress stickles. Assemble a co-ordinating layered flower with floss and button. Stamp happy birthday onto one of the Circe elements of the conceal paper and cut out, and decorate with a small piece of lace.
Arrange all these smaller elements on to the front of the card.
Ribbon Box
Kaisercraft Beyond the Page Three Drawer Storage Unit
Kaisercraft Timeless Collection - dress form
Kaisercraft Bird Song collection - robins egg
Kaisercraft acrylic paint - eggshell
Buttons & lace from stash
mini Tim Holtz embellishment drawer knobs
Before assembling the unit, make paper templates of the drawer fronts, side panels, back panel, and fluted top panel.
Assemble the unit and secure with superglue gel. Including the drawers. I find the supergel gel works best as it does not soak into the MDF or the cardboard of the drawers directly on contact.
Allow to dry, and in the meantime cut the panels from your desired paper. Here the sides and top of the unit are covered with the timeless collection paper, dress form. I intended this to store my delicate ribbons and lace so seemed appropriate. The drawer fronts are covered with paper from the bird song collection, robins nest. I tried to keep the continuity of the pattern as it was on the 12x12" sheet. It seemed a shame to disband it completely.
The fluted top panel is also covered with robins egg, and is decorated with buttons from my stash and a piece of while lace.
All raw MDF edges are painted with kaisercraft acrylic paint in eggshell.
To finish I attached some tiny little handles I had in my stash from Tim Holtz.
Robot Card
Kaisercraft Rough and Tough Collection - wild, awesome, action & dirty
Various peel offs from stash
Robotz cartridge (cricut)
I couldn't resist making this card. I make these robots with my Son's, particularly the youngest, all the time. The whole card (including the card base) was made using the kaisercraft papers - i think they make a perfect boys card.


