Monday, January 23, 2012

Elena's Banner


Happy New Year to everyone.
I'm back after a wonderful Christmas and New Year, that had been a long time in the planning. Unbeknown to Mum & Dad, who spent 3 weeks with us from just after the New Year, I had planned a surprise visit by my sister and her family. There were times over the secret months that Helen and I nearly buckled and exposed the whole story, so many times we had to confer to make sure we had covered our tracks and not let slip.
The logistics of our family means that a get together is not easy. The venue was with us in Rep. Ireland, Mum & Dad were visiting from Spain, and Helen had to travel with her husband and daughter (Jamie & Elena) from Cornwall, England. We even had to concoct a cover story, skillfully done by my husband Anthony, allowing him to go out alone early evening to a 'karate session' (without drawing suspicion) to meet Helen's flight at the airport.
By Dads own admission after the event, he was drawn in hook line and sinker, perhaps helped with the promise of a chinese takeaway being brought back home.
So Anthony headed out (karate bag in hand, secretly placed in the car he wasn't driving) to the airport and also the Chinese (the only detail that wasn't a lie). The nerves of the day had got to me at the stage and I could do nothing except sit incredibly nervously hoping no-one would talk to me while I waited for progress texts.
The moment arrived and on cue my niece acted as delivery person and boldly strolled in (to a house she had never visited before I might add) announcing 'anyone for takeaway'. I have never seen anyone so stunned let alone my own parents stuck for words.  Well done Elena!

***JOB DONE*** what commenced was a weekend full of fun.

*****--------------------------------------------------------------------------------------------------------*****

As an extra to this story, about 6 weeks ago Mum had the idea, that during our Monday night craft videos we take on the project to make a pretty banner for Elena, with the aim to send it to her for her birthday. At least stage I knew of the visit, so i had my own agenda to really try and finish it for then so Elena could take it back with her.
What added to my nerves on the day Helen, Jamie and Elena were due to arrive, was the fact that we hadn't quite finished the banner. Fair play to both Mum & Dad who went along with my erratic behaviour on the day, insisting that the house be hoovered and tidied (just as Dad had sat down to talk computers with Anthony) and insisting also that the banner must be finished and therefore almost banishing mum to my craft room. Actually it's making me giggle now how it must have looked.

To cut a long story short now, both Mum & I were quite chuffed with ourselves at how the project actually turned out. We didn't work to any plan or pattern, and made it all up as we went along. All we knew we wanted was for it to be pretty, and read 'Sweet Dreams'.
I thank Dad for taking the photos of the completed banner because they really show the detail that we added to each component.
Using a range of  embossing powder (kaleidoscope/clear ), and inking techniques along with sparkly stickles (and Mum very generous stickling application hehe) we embellished the Cricut die cut images from the Cindy Loo, and Lori's Garden cartridges.

Now without further ado, here is a chance to have a closer look at each of the letters we created. Hope you enjoy looking at it as much as we enjoyed creating and giving it as a gift.


 Back panel embossed with kaleidoscope powder. The butterfly and leaves are printed and cut from Loris Garden, and embellished with stickles, buttons and ribbon.

 Kept simple, but the buttons and ribbons are very effective.

Who could not love this little squirrel from Cindy Loo, printed again with Lori's Garden paper.

 Mum to took complete charge of this one and again she couldn't resist using her favourite Cricut Imagine cartridge.

Mum had made the flower at home and it travelled with her from Spain, and looks lovely teamed with complimentary ribbon.


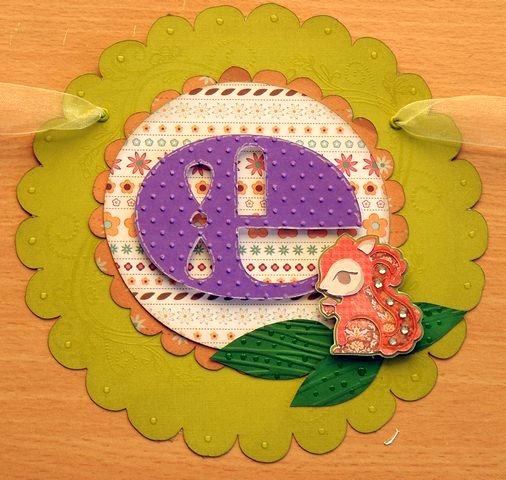
By this stage the theme for the banner had developed into a fantasy woodland feel. Mum really wanted bambi from Cindy Loo, and we couldn't resist the toadstools from Lori's Garden.

Simple but very effective and great work from the Imagine and Mum cutting and assembling the intricate bow. However there were giggles as a number of little pink gems for the bow 'pinged' around the craft room.

The bird cut from Lori's Garden is made up with about 6 layers, all printed on photographic paper, therefore giving it an attractive sheen. The glossiness of the paper mans the print quality is exceptional and crisp.

The cheeky frog will hold memories for Elena hopefully, as her Mum & Dad take her out for a milkshake and bacon sandwich at their favourite cafe called 'The Fat Frog'.
Cute

Here we sneaked in a little mouse from the Cricut Imagine cartridge, Nursery Tails.
I had had little copper charms for years in my stash and this was the ideal project to use it on.It reads cherish, dangling from the bow.

The butterflies are a single element from the Lori's Garden cartridge. Although not designed to be layered, by cutting more than one, they can be moulded and stacked using silicone glue to add much needed dimension.


Thank you very much for making it this far with me. This is a marathon entry for me - phew.

I will post some more detailed photos of each of the letters, and also a photo of the banner in situ in Elena's bedroom.

Thanks for looking x

Photobucket

Tuesday, December 20, 2011

Quick Christmas Cards

How are we all doing with the festive preparations. Personally I have not stopped for seems like weeks, and am definatly flagging now. Just the wasjing, ironing and cleaning to do - HOORAY (not my most favourote jobs).


Like, I bet you all needed just a few extra christmas cards too, and these are what I rustled up. My craftroom now is in complete dis-array and I have amazed myself at how messy I can be. I should really take note when I am constantly telling the boys to their rooms !!


Photobucket

Tuesday, December 13, 2011

Some Christmas Cards & Tags

As usual I am behind in the making of my christmas cards this year, making my customary slow start. For some reason I have a complete mental block when it comes to festive makings. I have 2 boys that talk endlessly about christmas, I have the tree and decorations up, and even (dare I say it) presents all bought and wrapped. But i still need to hit on those one or two christmas designs that will get me going.

I did however make these. The first 4 panel decoration started out as a card but, I liked it so much that it landed on my mantelpiece, and there it is staying. It did inspire however the scaled down version, and I was also particularly pleased with the gift tags too - made with Tim Holtz distress stains and inks and my favourite christmas stamps.


Right, I feel better now having updated you all. Now its time to rustle up a dinner from the last of the freezer food (waiting to restock next week for christmas), the bath and bed for the boys and hopefully another round of christmas cards for me. I am on a roll today and feeling quite chuffed with myself, having wrapped presents this morning and even managed to book myself that long awaited hair appointment next week. This year it is all about planning as Anthony works away now for 2 weeks at a time, and now not due back until the 22nd - and its up to me to get all the preparations sorted. The deadline for me is also the 22nd/23rd (apart from the last bits of cleaning), then we are all officially on holiday!

Merry Christmas to you all if I don't make it back before then and many good wishes for the New Year. xxx

I have entered the gift tags into this weeks challenges on the Sugar Creek Hollow blog. A lovely blog that is concerned only with all things vintage in crafting, and a site that I will continue to visit many more times.

Photobucket

The start of Christmas

Although it has been a while since I posted last, I have still been creating. As well as the items I am sharing with you now, I have busy sewing and making curtains and blinds for the last remaining windows downstairs that were not dressed. As my eldest son put it 'we are now boarded in'! and it is lovely and cosy now to be able to shut and draw the curtains and blinds against these cold dark wintery evenings. As I chat with you now, the hail is coming down again for the umpteenth time today!

I wanted to start the countdown to Christmas with some special advent calenders, as gifts for my Niece Elena and the children of a friend.
I bought the advent calender kits from Kaisercraft, and decorated them with Basic Grey Nordic Holiday paper, Kaisercrafts Silly Season paper and My Mind Eye traditional christmas paper.
Each kit started out flat packed like this,


Using the Basic grey paper I created this fresh looking calender for Elena,


For my friends children I created a vintage looking calender with the MME paper, and then with the Kaisercraft paper proper traditional colours. I left them to choose who wanted which as they were both suitable for a boy and a girl.


I tried to make the central collage as dimensional as possible, and for the MME and Kaisercraft calenders I used the cricut Imagine to cut out the elements.

As a finishing touch before sending them on their way, I added a little festive chocolate to each of the drawers as a small treat and aide the passing of the days towards christmas.

I think they were all well received as a welcome surprise in the post. Next year I will make 2 more for my own boys, who this year were treated to Lego Star Wars calenders each (now I have even more Lego laying around on the floor and being sucked up in the hoover!)


 Thank you for taking the time to look.

Photobucket

Sunday, November 20, 2011

Birthday cards worthy of a mention

Stephen had some brilliant cards for his birthday, and they are worthy of a post for themselves.
This is Mum card and sums Stephen up perfectly, he is most definatly a little scalley wag (a term that makes him laugh).


The inside of this card is perfect too, and being in pirate character Stephen has 'trekked through the house' using the map to find treasure - older brother patiently in tow dutifully joining in.

The other two handmade cards that are also worth a mention are made by my Aunt Rita. Rita makes lots of cards that are so detailed and amazing, and supplies cards to another aunt who sends them onto us. The first card is also great for Stephen because like any 4 year old, monsters and spaceships are an important part of their day - what is life all about if they haven't got an alien to chase and defeat !! ;-)


Rita puts alot of thought and effort into her cards especially the colouring and is a huge fan of the copic pens.


All of these cards will be going into the ever expanded box of cards that I cannot throw away once the birthday/occasion has passed.
THANK YOU.xxx


Photobucket

Thursday, November 17, 2011

YOU'RE 4 TODAY - Happy Birthday Stephen

Today is Stephens birthday, and unbelievably he is 4 - where have those years gone.
Stephen has grown up and changed alot over the last 6 months, and we are entering a new phase in his young life and he is definatly developing his own unique personalilty.

I am really pleased with my card (actually its more like a scrapbook page as it is 12 x12 inches.)
Again using my new Buccaneer cartridgefor the Imagine, it wasn't too hard for the idea to come together.


What I do like doing at the moment is printing the Imagine images straight onto patterned paper. Like I did here, the shipwrecked ship in the background is printed on to paper loosely resembling the atmosphere under the sea.


 With the help of distress inks and distress stickles, all the images come to life.

To highlight the flag, I outlined with a gold Krylon pen, and added the toothpick (stained with walnut stain distress ink)
 
I'd like to say thank you very much for Stephens cards and presents.


Tuesday, November 8, 2011

Ahoy there !!


This is just a quick post with a birthday card I made quickly for a 10 year old birthday party. It was the perfect opportunity to use the Imagine cartridge, Buccaneer.
The images print beautifully, but they really come to life when you start inking the edges and distressing the paper. Taking inspiration from many pirate films I have watched (and my own little four year old pirate character running about) it is a pleasure to work with this cartridge.


Photobucket